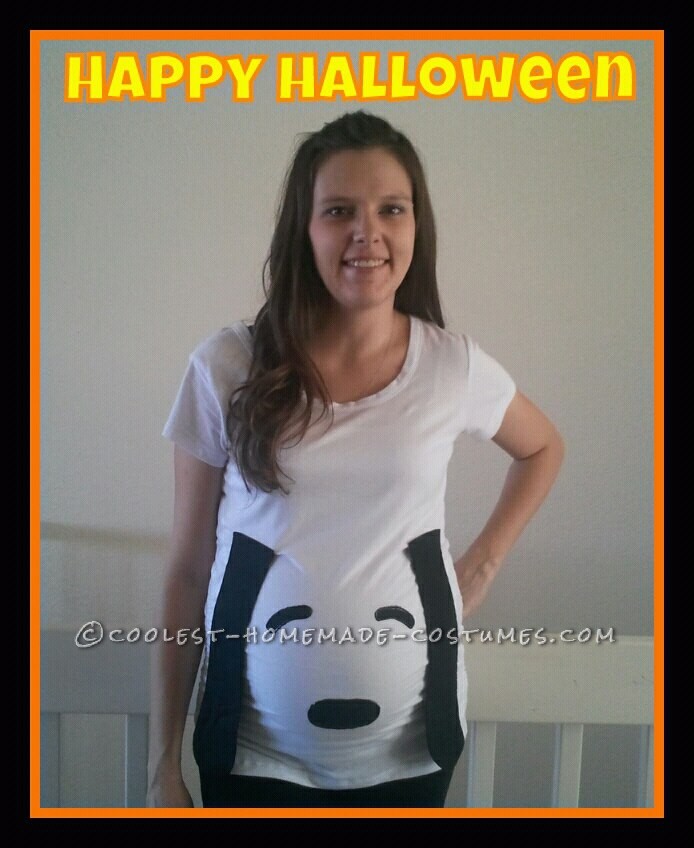
I am currently 7 1/2 months pregnant and I am a Preschool teacher. I wanted a fun child-like costume that was age appropriate for my class that would also fit my baby bump. I decided to go with Snoopy costume from Charlie Brown.
Supplies Needed:
- 1 white maternity shirt – I got mine at the family dollar for $5.00, it was plain white with the gathering down the sides.
- 1 quarter flat of solid black fabric – I went to Walmart, in their sewing section they sell scrap quarter flats for 97cents.
- Small bottle of puffy paint – I also got this at Walmart in the craft sections for $1.29
- 1 white colored pencil (to mark your lines for cutting out the black fabric) – My husband had one in his drawing kit
- 1 12 inch. ruler – I had one laying around the house
- Hot Glue Gun or Tacky Glue for Fabric
Step 1: Cutting out Snoopy Ears
Lay out the black fabric and iron if needed. Fold the fabric into half (lengthwise) two times (so when you cut the ears you have all 4 that are exactly the same). Use your ruler and make two parallel lines (with your white colored pencil) about 12 inches in length and about 4 1/2 inches apart from each other. Use something with a rounded edge and place at the bottom of the two lines and trace to make the bottom the the ear rounded (I used a small bowl to make my rounded edge). At the opposite end (the top of the ear) draw a straight line from each parallel line to close off the top of the ear. Cut out while still folded and you will have 4 ear cut outs that are all exactly the same size.
Step 2: Sewing Snoopy Ears Together
Pin two of the ear cut outs right sides together, do the same to the other two ear cut outs. Sew the two ear cut outs together leaving the top of the ear open, do the same to the second ear. Before turning the ears right side out be sure to cut a few slits along the edge of the bottom of the ear (rounded part) being sure not to cut thru the sewing you just did. (this is to help the rounded edge lay flat and not bunch up when you turn the ear right side out.)
Step 3: Sewing the Snoopy Ears to the Shirt
I found that it is easier to place the ears where you want them if you have the shirt on…. You can also do it with the shirt off if you would like. So take both of your Snoopy ears and have a couple of sewing pins in hand and place your snoopy ears on either side of your belly (mine were about 6-7 inches apart) just below your bra line and pin. Use a sewing machine to sew the Snoopy ears into place. (you could also use a hot glue gun if you would like but I don’t know how well they would stay attached to the shirt with the ear flopping around).
Step 4: Cutting out Snoopy Eyes and Nose
Take the scraps that are left over from cutting out the ears. Nose: Fold one section in half and cut out a half oval, this makes it so that both sides of the nose are rounded exactly the same. I just free handed it but if I have to guess i would say the nose i cut out is about two inches long and 1 inch wide. Eyes: Fold another section of the black fabric in half and cut out a crescent shape with rounded edges for the eyes. Again, I just free handed it.
Step 5: Attaching the Snoopy Eyes and Nose
Once again I found it easier to place the eyes and nose in the right spot with the shirt on. Grab your Snoopy eyes and nose and a few sewing pins. Place each eye where you would like them and pin. (I just guessed at this one) Next place your nose where you would like it and pin as well (I placed my nose centered right over my belly button). Once you have your eyes and nose placed where you want them, take a flat of cardboard and place it inside your shirt where you will be gluing (this is so that you don’t glue your shirt together LOL) its time to take your hot glue gun or tacky glue (I used a hot glue gun) remove the pins from the eyes and nose, be careful not to move them, and use a little bit of glue to attach the eyes and nose to your shirt.
Step 6: Finishing Snoopy Touches
With your cardboard still in place, take your black puffy paint and go around the edges of your eyes and nose. (This is to help them stand out and to keep your fabric from fraying around the edges.) Be sure to let the puffy paint dry for the length of time that is on the bottle. Mine said dry in 4 hours but I let it sit overnight just to be sure.
This was a super easy and fun costume to make and I got a lot of compliments on it. All of my preschool kids loved it… besides the fact that apparently none of them know who Snoopy is and they just thought it was a puppy dog. LOL Oh well I guess that is just the younger generation for ya! Hope everyone enjoyed it!

Related costumes:
 Coolest Maternity Costume – Finished in 20 Minutes!
  Coolest Pot of Gold Maternity Costume
  Cute and Easy Maternity Costume – Marsupial Mamas: Koala and Kangaroo
  Easy Homemade Maternity Saturn Costume
  Baby Bump’s First Costume: Pot o’ Gold at the End of the Rainbow!
  Easy Button Maternity Halloween Costume
  Coolest Homemade Jack “Bellington” Maternity Halloween Costume
  Addy Caddy Flower Car Wheelchair Costume
Your comment has been sent successfully.