Back in 2009, my mother and I were on your website and came across a photo of a headless boy with his head in a jar (2007’s grand prize winner). We were captivated, and that year, my mom recreated that costume for herself (minus the jar). Dressing up as well, my husband and I attended a Halloween costume contest with Mom. She received countless stares and compliments!
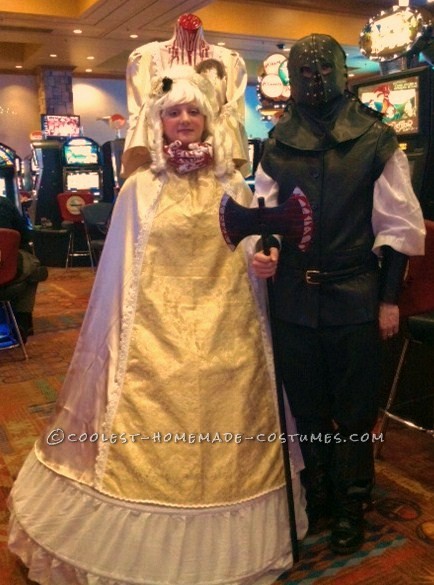
Inspired by the fun memories of that night years ago, I knew I wanted to repeat the awe of the headless illusion, but also desired to get dolled up and wear a fancy dress. This is how I came up with the idea of portraying Marie Antoinette after her beheading.
I started brainstorming ideas, researching Marie Antoinette and the history of her era, and slowly pieced together my outfit (and also the executioner costume for my husband, Nathan). I started this back in June or July, as I wanted to take my time and enjoy the process. The Instructables website was a tremendous help to me! There were several renditions of how to pull off this costume, and was able to pick and choose different techniques and tips that fit into my budget and skill set.
We were not only thrilled (but also very grateful) to take home $250 for winning 3rd place at the costume contest we attended. See, my husband and I are both unemployed due to chronic illness (we live with my in-laws) . So, the financial boost was wonderful! And although creating these costumes was a lot of work, it also gave me something to look forward to and kept the blues at bay. On top of that, it also doubled as a history lesson. The compliments, stares, waves, thumbs-up and friendly conversation with strangers formed fond memories that still makes us chuckle. Oh! And I am proud of the creative skill it took for me to use the restroom while in costume!
Marie Antoinette Costume:
The dress, crinoline, wig, mannequin torso, and satin gloves were all purchased on Ebay. Any other items used, I already owned or I bought at a local store (such as Walmart). They included: a backpack, duct tape, scissors, pen, cardboard, red nail polish, 2 pillows, scarf, seam ripper, wig cap, makeup/jewelry (as desired), and lots of safety pins.
After some trial and error, I put the costume together accordingly:
Since the mannequin was hollow in the back, I traced, cut out, and taped cardboard from a large box onto the mannequin’s back so it would not look concave.
I found a backpack and zipped up all compartments. While wearing the backpack, I had my mother-in-law hold the mannequin in place against the backpack, while we stood in front of the mirror. My husband then duct taped it in place well enough for me to take off the backpack, and finish the job. We had to do this twice, as the first time, the mannequin was crooked. I went through lots of tape, but in the end, it was stable and still really lightweight!
The satin gloves were stuffed with filling from an old pillow. It was important to me that the hands not look lumpy or “crackle” (as they would if using plastic bags or newspaper) and this worked out well. Before this, I had tried putting some rolled up tissues into the fingers of the gloves, but this proved to be difficult. I also tried putting 2 different styles of gardening gloves inside the satin gloves themselves, thinking that they would look smooth and effectively “stuffed” but that was even more of a pain. Definitely stick with the pillow idea!
For blood, I poured red nail polish over the gloves and the neck of the mannequin and let it drip down onto the chest area. However, any areas on the gloves not heavily coated in polish, turned bright pink. In those areas, I had to paint over them by hand. I let these items dry overnight.
Using safety pins, I secured the gloves inside the sleeves of the dress, making sure enough of the “hands” were showing to hold my “severed” head. I also interlocked the fingers of the gloves and pinned them together.
While wearing the backpack with the mannequin now attached, I noticed there was a gap between my head and the mannequin’s body. To fix this, I attached a small pillow between my bottom and the heavily taped backpack with a scarf. This pushed the mannequin closer to my body, and made quite a difference in pulling off the look.
The dress came in two pieces, so I put the jacket on the mannequin (taped it into place so it wouldn’t fall down the shoulders), put on the backpack, and pulled the skirt up to my neck and made sure it went around the entire mannequin as well. This is a 2-person job. The skirt had an elastic waist, and my mother-in-law had to remove some of the elastic 3 different times, in order for the skirt to not be too tight around my neck, it choked me quite a bit at first! She also used the seam ripper to cut holes in the sides of the skirt for when I had to break the illusion to use my arms. Came in very handy!
Wearing the crinoline was crucial to having that “full skirt” look, as it was to adding length to the dress itself.
Although the wig was of great quality, I decided to dress it up even more with a gold hair clip. I slipped on a pearl ring onto one of the gloved “fingers” and wore matching earrings. After researching makeup trends of Marie Antoinette’s era, I made sure to accentuate her pale skin, rosy cheeks and lips. I also used the red nail polish to draw a streak of “blood” coming out of the corner of my mouth down to my neck. It dried very quickly and the smell was not overpowering, nor did it sting on my skin.
We attended 2 Halloween costume contests. I could not be in full costume and fit in the car, so I would wear the crinoline and skirt in the car, and have the mannequin in the back seat. Once we got to our destination, I would put on the backpack and my husband would help me pull up the skirt to my neck and around the mannequin. He also would pin the skirt underneath the jacket in the back, because the skirt had a tendency to droop down in the back and reveal the taped up mannequin underneath. This took some practice on my husband’s part, but by the 2nd costume party, he had it down pretty well!
Finally, I was ready to flip the secured hands over my head and place them under my chin.
Marie Antoinette lives on!
Executioner Costume:
The mask, boot covers, leather jacket (later made into a vest), gauntlet (which I used as a pattern to make our own pair), and white shirt were all purchased on Ebay. Again, the other items needed we either had already, or bought at Walmart (or similar store). Those items included: black shoes and pants, belt, leather scraps, empty cereal box, black shoe laces, duct tape, scissors, red nail polish, safety pins, hole puncher, measuring tape, lip pencil, and plastic axe.
Being a history buff, Nathan wanted to look as “period-accurate” as possible. After searching high and low, we found an impressive reenactment photo we thought we could imitate.
Making the costume:
As mentioned before, I purchased a leather jacket from Ebay. I started by cutting off the collar.
To remove the sleeves, I had my husband decide how long he wanted them. Using a measuring tape, I marked where to cut on both sides, in order to make them as symmetrical as possible. I used a lipstick pencil to do this, so it would show up on the black leather. I have never done any alterations or sewing in my life, so I was nervous, but was satisfied with how it turned out! Nathan loved the look of the genuine leather, instead of wearing a low quality store-bought costume.
Originally, I ordered the gauntlets online, but once the package arrived, I was disappointed in discovering that only 1 gauntlet was included in the price, not a pair as I had expected. Running short on time (and money), I decided to make them myself.
Using the lone gauntlet that came in the mail as a pattern, I traced it onto the leftover leather scraps from the jacket sleeves (not forgetting to mark where the holes for the laces would go), using the lipstick pencil. I did this twice to make a pair.
I took an empty cereal box, cut it apart to lay it flat, and traced the gauntlet on there (twice) to give the gauntlets more stability.
After cutting out both the leather and cereal box templates, I punched lacing holes in each of them separately, and laid each leather pattern on top of its corresponding cereal box one.Some of the holes did not line up with each other, so i had to go back in with the hole puncher, and redo several of them. Next time, I will “hole punch” them at the same time.
Afterwards, I duct taped the leather and cereal box patterns together.
Lastly, I weaved them together using the black shoe laces. Again, as an amateur crafter, I was happy with how they turned out, Nathan was too! He loved the authentic look, and that they were adjustable.
To keep his white shirt sleeves pushed up, we tied them tightly with the interlaced ribbon the shirt sleeves came with and pinned into place.
The mask had long strings that hung down, left over from its laced-up sides. I didn’t like the way they looked, so I secured them inside of the mask.
The boot covers only came in one size, were quite loose on Nathan, and tended to sag. I pinned them to his pants, both front and back, making sure the pins were not visible.
At last, all that was left to do was to get dressed! Since his eyes were the only visible part of his face while wearing his mask, we used dark eyeshadow and eyeliner to add drama.
“Off with her head!”
I hope you had a fantastic Halloween, and thanks for reading!!!

Related costumes:
 140+ Mesmerizing Headless Scary Halloween Costume Ideas
  750+ Horrifyingly DIY Spooky, Gory, Dark and Scary Halloween Costumes
  Scary Headless Marie Antoinette Homemade Halloween Costume
  Coolest Monster Exterminator Costume
  Coolest Homemade Head in Freezer Costume
  Coolest Homemade Alien Abduction Costume Ideas
  Cool Handmade Headless Bride Costume
 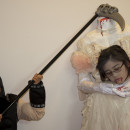 Scary Headless Marie Antoinette, Louis XVI and Executioner Costumes!
Your comment has been sent successfully.