The Bottle of Jager Meister was a fairly simple costume to make. I knew I needed to have a square main body but most importantly find a way to have it taped in at the top to show the outline of an actual bottle. My first thought for the body of the bottle was to create it out of wood. I realized this would be very heavy to carry around all day and would have a hard time attaching something to keep it at the proper height.
My next idea was to use PVC piping and create a box out of the piping. While in home depot and looking at the cost I found the piping for the whole box with all the joints to cost about $50 and wasn’t looking to spend that much. I found some 1’ insulation foam and figured I would glue it together with some carpenters glue and attach some suspenders on it to keep it at the proper height. The cost of the Styrofoam was only $8.97 and the carpenters glue was $4.97.
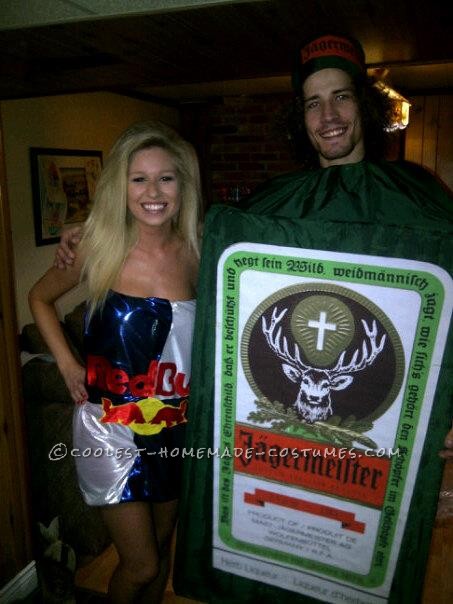
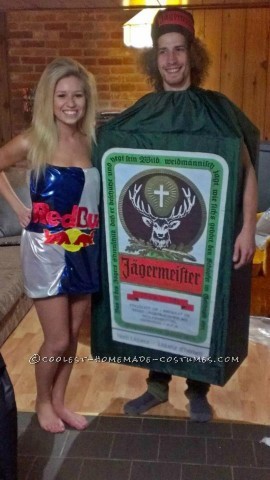
To determine the size the box needed to be I measured the width of my shoulders and added to inches on each side for room to move to equal 24”. To determine the length I had to get the label printed so it is proportional to an actual Jager bottle. I took HD pictures of an actual Jager bottle. At my college there is a large format printer that students are able to use and I printed them there, and it only cost me $12. I was able to determine that the length of the bottle was to be 60”. The sheets of Styrofoam were 18” and I needed the front to be 24”. I took an exacto knife and cut 2 sheets of Styrofoam to 6”.
I figured I needed to keep the sheets together so in one sheet I put toothpicks and shish kabob skewers through it and lined up the other sheet to stick it together. I did the exact same for the back piece and then continued to put glue on the seam of the two pieces of insulation. If I needed to do this again I would but the glue right in the joint along where the tooth picks were, it would make for less of a mess.
When putting the box together I found some difficulties trying to make it square because I couldn’t keep the foam upright for long enough for the glue to set. I took out the tooth picks and shish kabob skewers again and stuck them in place and then applied the glue to the joint. Again, if I needed to do this again I would but the glue right in the joint along where the tooth picks were, it would make for less of a mess.
My next step was getting the box an olive green color, like the Jager bottle is. My first thought was to paint it but thought it would be a huge mess. Instead I went to Fabric land in search of an olive color fabric. Luckily I found one in the clearance section for $1.50/m and it was just the color I needed. The fabric was about 8 ft wide so I figured 5 m would do for what I needed and it only cost me $7.50.
When attaching the fabric to the Styrofoam I first pinned it in place on the foam to see how it would look. On the bottom I folded it under and behind the foam about 1 inch. At the top I left any extra hanging there and figured I would use it to create a bottle neck shape some how. After pinning I simply took it one panel at a time folding it over applying glue to the Styrofoam and spreading it around then folding the fabric back over. I ensured the fabric had no creases by pulling it tight (pins were still on 1 side to hold it) and using a squeegee to push out any wrinkles. I did this for 1 side and then let it sit for 2 hours then did the following 3 sides in the same fashion. With the box dry and colored I applied glue to the label and carefully centered it and glued it to the front and back of the box.
With the labels attached the costume was finally coming together with only suspenders to attach to the inside to make it stay up and some how to create a bottle neck top. I though of using a hanger and wrapping it around my neck then attach the fabric to the hanger. I attached the fabric by using safety pins and pinning it from the inside just underneath the circular hanger. I tried several different ways until I found one that worked best. After putting about 20 safety pins in the neck piece I put it on and it had the perfect look. I also found that this neck piece sat perfectly on my neck and shoulder comfortably that I didn’t even need to add the suspenders inside the box.
My last step was to make the hat. This was really a last minute accessory. I went to the dollar store and picked up a $1.50 plastic garbage can. I was able to cut this with a pair of tin snips and cut the can in half. I had some extra fabric I didn’t use so I wrapped the fabric around the can and tapped it inside the can so it would stay. I printed of a Jager Logo and put it on the side and top of the can and put it on my head.
The Red Bull can was made using shiny fabric material from Fabric Land. I bought 2m of the silver, enough to wrap around me nearly twice, and 2m of the blue, for the blue rectangular designs on the can, and a little more in case I made mistakes.
A few ideas ran through my mind on how to put it together, and since I don’t have a sewing machine or the ability to sew, I had to narrow it down to fabric glue or pins. Duct tape was another option but I wanted something I could easily put on and take off without having to cut it. So I got an old tube top that stretched down long enough for a dress and I pinned the silver fabric all around it ( I had some help as well because it was on me the whole time). Any excess material was just cut with scissors and then folded under and pinned for a smooth look.
Once the silver base was on I made lines in pencil where the blue design would go, and then cut out the shapes, which I didn’t get right the first time. Once I had shapes I liked I layed the tube top flat and I fabric glued the rectangles on in the appropriate shape. To make the lines look smooth since my cutting wasn’t perfect, I had left enough room to be able to fold the edges under and glue that so there were no jagged edges. I layed hard cover books over the lines to let the glue stick better.
For the Red Bull logo I bought red and yellow fabric (not shiny like the base colors and I zoomed in on a logo on my computer so I could trace it on to a piece of paper. I did each individual letter first, and then the bulls and the sun. Once I had them cut out on paper, I taped each individual piece to the appropriate color fabric and cut along the lines. Once that was done I glued the logo on to the base and set more books over it and let it lay flat over night. All together this costed me about $25., but hours of work.
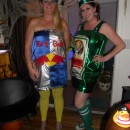
They turned out really awesome and we got tons of compliments. The hard work definitely paid off !

Related costumes:
 Cool Jager Bomb Couple Halloween Costume
  Cool Jager Bomb Couple Costume
 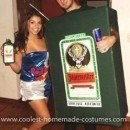 Original Jager Bomb Couple Costume
  Coolest Homemade Ice Cream Adult and Children Costume Ideas
 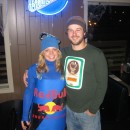 Cute and Creative Couple Costume – A Jager Bomb!
 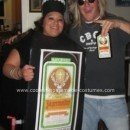 Coolest Homemade Jager Bottle Costume
  Coolest Jager Bomb Couple Costume
 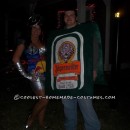 Cool Homemade Jager Bomb Couples Costume
Your comment has been sent successfully.