
I was looking for something unique for my daughter for Halloween. I make the costumes for myself and my children (and sometimes my hubby) every year, we don’t wear them twice. I enjoy putting things together that one may not normally think of and coming up with something that makes people look twice and say, “Wow! That’s a great idea!” I usually brainstorm for about six months following Halloween before I decide on what I want to make and begin 2-4 months before Halloween in development stages and spend about a month making the costumes themselves. Often one costume takes much more time, money and effort in making than the rest. This costume cost me approximately $38CDN and about 8 hours of my life.
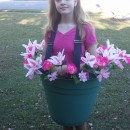
When I suggested the flower pot costume to 10-year-old “Petunia”, who grows like a weed, she kind of rolled her eyes and wasn’t all that impressed with the idea. Remarkably, what sold her on it was my telling her that I would turn an old watering can into her treat bag! I think she really just wanted to see how I would do it. I don’t think she was disappointed.
We trick-or-treated for about an hour and a half but we really didn’t get very far or knock at all that many homes as Petunia was visiting with almost every person who answered the door because they marveled at her costume. She had photos taken (with my OK and promises not to post them online), was told that hers was the best costume they had seen and even received extra candy for originality in her costume! Her friends that we encountered didn’t recognize her until she spoke and then, they were in awe. At the end of her tour, she beamed at me, “Mom, I think most kids my age would think this was a pretty stupid costume – until they saw it! I think it’s awesome!”
The Pot:
I had an old, small, round plastic laundry basket with a small crack in the bottom and one small split in the side.I decided to make this as the frame for the “pot”. I should note here that I intended to use a large plastic terracotta colored planter for this, but was unable to find one large enough at this time of year, but I am glad I did not and I will explain why later.
I cut the bottom out of the laundry basket with a pair of kitchen shears (the kind you use to cut chicken bones). Then I made sure that my daughter fit inside it. I suggest that you measure first, this was a snug-fit. ;)
At this point, I also decided to cut about 1.5 inches off the bottom of the frame to make walking and sitting easier, as well as making the fit a little more comfortable for her. I attached a pair of clip-on suspenders the mesh of the basket, front and back.
I had some paper that had autumn leaves and wood-grain print on it. My intent was to cover the pot frame with this to look like a wooden planter. However, once attached (with duct tape from the inside of the frame), it did not have the desired look so that idea was, literally, trashed.
I then decided that the pot would actually be a skirt and went to my local fabric store. I trolled every aisle, looking for something just the right shade of brown or terracotta color with the right texture, opacity and weight. What I found was in the scraps and roll-ends bins. I found a beautiful milk chocolate brown blanket fleece 0.8 yard remnant for the jaw-dropping price of $3! This was perfect! It would be warm, flexible and comfortable.
When I got my treasure home, I trimmed the excess length of approximately 1 foot from the fabric. I hand-stitched it into a tube (I do not own a sewing machine – perhaps another future purchase) and slipped it over the outer frame of the pot. I turned the upper edge over the rounded lip of the pot towards the flowers, tucking it in tightly. Then, with a cut length of garden hose just long enough to go around the pot, I snugged the fabric under the rolled lip of the pot and attached it by stapling through the fabric, the pot lip and the hose with heavy-duty staples all the way around. I left the lower part of the fabric loose which gave the freedom of the skirt.
Gathering Supplies:
Now it was time to visit my favorite place, the local dollar store. I spent 30 minutes selecting $30-worth of artificial flowers. These had to be variegated enough that it wouldn’t look like a mass of one color over-flowing from my daughter’s waist/chest area (I had yet to decide where the basket would sit on her – adjustable suspenders) and still fill the outer area of the pot all the way around. Two dozen bouquets and one single large, odd-flower-out later, I was finally pleased with the assortment I had to work with.
I was planning on attaching the odd-flower to a hair band and using green hairspray in Petunia’s hair. But then I saw it! Hankering angels and an awe-inspiring ray of light; a fabulous (OK, not-so-fabulous, but perfect for a wild-flower) green bob-cut wig for $2! HALLELUIA! :D
I also picked up some face-paint crayons which are a-dime-a-dozen at the dollar stores at Halloween (OK, $2 but you get what I mean) and a package of Christmas tree icicles (the static-y, fine, silver foil strings that stick to everything and you still find entwined in your daughter’s hairbrush in mid-March and your vacuum power head until next Christmas) for $1.
$35 and four large bags later, I rushed home to start my floral arrangement!
“Planting”:
I sorted my 24 assorted bouquets by color. I laid them out on the floor in an alternating color pattern in the order I wanted them to be “planted” around the outer edge of the pot. Then I cut the outrageously long stems to a length that would reach the bottom of the flower pot and still protrude above the lip of the pot about 2-3 inches, using my kitchen shears again. (Note to self: buy a pair of wire cutters and new kitchen shears.)
Suddenly, it struck me with a big palm-to-the-forehead “DOH!” how am I going to attach all of these flowers to this basket? Hot glue?—No. Staples?—No. Duct tape?—No. Twist-ties?—No. Elastic bands! The tension of the bands would hold them snug to the basket! Now, I’m not talking the flimsy, tangle-in-your-hair-so-badly-that-you-have-to-cut-them-out-and-look-like-you’ve-been-attacked-by-a-weedwacker, office stationery elastic bands. NO! I mean the heavy-duty whole-head-of-broccoli bands from the grocery store! I have hundreds of those things — much to my children’s chagrin as that means we also EAT a whole lot of broccoli!
Working from the inside front middle of the pot (remember the suspenders are already attached) I looped the elastics around each stem at about the middle and a cross-bar of the mesh of the basket multiple times and stretched it back over the lower flower stem. This took an alarmingly long amount of time, about four hours for the two dozen bouquets! But the flowers are nice and secure! (Note: zap-straps would probably have worked better and faster. I also have hundreds of those.)
Main Bloom:
I removed the single flower from its stem and foliage completely. Using a hot glue gun, I attached individual leaves directly to the blossom. **Hot glue is VERY hot, especially when in contact with fabric-coated wire. DO NOT TOUCH IT! Use a pencil or plastic spoon or really anything else but your fingers to hold hot glue-covered, fabric-coated wire items to something to which you are attaching it. Take my word for it! I severely burned my left thumb-pad. Like, instant white blister! And get this, hot glue is STICKY too! Very difficult to remove! (Tip: run it under cold water and carefully remove once cooled.)**
Once the leaf glue had cooled (and I had self-administered first aid) I hot glued the underside of the bloom to the crown of the green wig. **DO NOT TOUCH A WIG WITH A HOT GLUE GUN TIP! It will melt the wig hair off.**
Watering Can Treat Bag
Here is where the Christmas tree icicles come in. I had a large, old plastic watering can with a split in the bottom seam. After washing very well, with very hot and soapy water, I cut out the bottom of the watering can and enlarged the top hole for refilling using those ever-handy kitchen shears again. My watering can has the sprinkler-type spout that comes off separately which was exactly what I needed for this project.
Using my largest-eyed needle, I threaded 12 pieces of the icicles foil through one sprinkler hole from the outer side to the inner side and then out a 2nd sprinkler hole from the inner side to the outer side and evening up the icicles so they were ½ coming from each hole. I repeated these three steps for each of 26 pairs of holes in the sprinkler head of the watering can, while carefully holding taut the rest of the icicles already threaded through.
Once all were threaded, I turned again to my trusty hot glue gun. From the inside of the sprinkler head, I carefully crossed each loop of icicles with a generous dollop of hot glue, being sure not to touch the icicle foil with the glue gun tip, which would surely have melted the material. Also, I was careful not to pass over the holes of the sprinkler head with the molten lava, er, hot glue. Being once burned made me more than twice shy of the ooey-gooey stuff.
Now you’re wondering why I cut the bottom out of the can. It was only a split seam that surely would have allowed for the collection of candy! Well, I know that if my daughter’s bag couldn’t hold all of the candy that she collected on our tour of the neighborhood, that I would be forced to lug around the loot. Which would not be a problem if it were not for the following simple facts: 1. that if she were not carrying the weight of the fruits of her labor, she would be able to walk for a longer duration, thereby adding to the weight of the burden I would have to carry and making me have to carry it longer; 2. the fact that she would collect much more than she would need or could ever consume, hence leaving it to me to assist in the consumption of said booty in order to reduce the amount of waste; and 3. this would only reduce the amount of food waste and increase the amount of my waist! So, I cut the bottom from the can in order to increase the capacity of the treat bag. I did this by adding a liner of the traditional Halloween treat bag—the pillow case.
I took a black pillowcase (which we have used in other trick-or-treating expeditions, as well as a few over-nighters where there was a good chance the pillow would end up outside a tent) and fed it from the bottom of the can up through the top of the enlarged refill opening, over the edge of the can and secured it firmly with several rows of office-quality staples all the way around the top of the can. The reason for several rows of staples was to ensure that the weight of the candy in the pillowcase would not pull it from the can, causing bent staples and snag hazards.
Once the bag was secured, I replaced the sprinkler head on the watering can.
Finishing Touches:
Petunia wore black leggings, a black sweatshirt, a green t-shirt and her rubber boots.
Her face make-up consisted of green-eyeliner vines around her eyes, black-eyeliner exaggerated eyelashes, glitter eye shadow, two pink face paint round, rosy cheeks and pink lip gloss.
Her hair was pulled into a pony-tail and tucked up under the wig.
Every time Petunia came to a door, she would knock and as the person opened the door, she would “water” her flowers with her up-raised watering can and call, “Trick or Treat”.
She was adorable and she was told such many times throughout the evening. It was wonderful to see her and so many other people enjoy her costume so much!


Your comment has been sent successfully.