Halloween is definitely my favorite holiday of the year! As I had to skip last Halloween because I was planning my wedding, I decided this year should make up for last and be twice as amazing. So I started talking with my best friend in late August about what we would be that year. We decided together that being the entire Family Guy main cast would definitely top any other ventures we had tackled in the past. When we embarked on this journey, we had no idea just how involved it was going to be. About half way in, I realized just exactly what I had signed myself up for and how much work it was really going to be. It ended up turning out wonderfully, but I won’t deny that it was quite time consuming and much more work than I had expected. I would say that we collectively put in about 80 hours of work over the course of around seven weeks.
We decided that Katy and I would spend the money and make the costumes, and then depending on how much we won in costume contest prizes we would take what we had spent and then divvy up the rest to the other participants in our group. Time to go supply shopping!
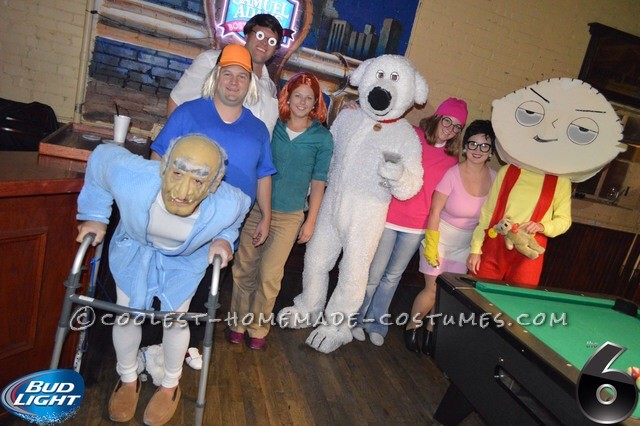
Group Picture
Supplies
First, I sat down to a couple episodes of Family Guy with my pen and paper ready to take down notes on all the supplies I could imagine that we might need to make the costumes. I ended up with quite an extensive list.
Second, I set a date to get together with Katy to go supply shopping. We started at the Spirit Halloween shop to find what we could there. We ended up with four wigs for Peter, Meg, Chris and Louis and also a fake baby bottle for Stewie. We tried to find fake glasses for Peter and Meg, but they didn’t have what we were looking for. I also got generic white clown gloves for Brian’s hands.
Then to Walmart; there we got pants for Peter and Louis, a white shirt for Louis that we planned on dyeing, a children’s Hello Kitty beanie for Meg (the inside was pink and we couldn’t find a plain pink beanie), and two packages of wife beaters for Chris and Peter’s costumes.
We then moved on to Hobby Lobby where we knew we would find the bulk of the things on our list. We got furry fabric for the Brian costume, red fabric for the Stewie pants and Brian’s collar, a belt buckle for the Brian collar so that it would look like a real dog collar, brown fabric to make cartoon shoes for our friend playing Peter, poly-fill for stuffing Peter’s shoes and shirt and Chris’s shirt to make them both look considerably overweight and also to stuff Brian‘s tail, a white long sleeve t-shirt to dye yellow for Stewie’s costume, large buttons to paint yellow for Stewie’s buttons, four pairs of canvas shoes for painting to match Meg, Chris, Louis and Stewie’s shoes, a large round necklace charm to paint gold for Brian’s name tag, white tulle for Stewie and Brian’s eyes, black and white puff paint for Stewie and Brian’s features, black pipe cleaners for Stewie’s hair, a white and a pink t-shirt for Meg’s outfit, thin wire for Meg and Peter’s glasses, black spray craft paint for the glasses, a blue t-shirt for Chris’s outfit, a child’s hat to paint – also for Chris, a teddy bear for Stewie to carry, yellow, teal and green Rit Dye, disposable gloves, skin colored spray paint for Stewie’s head and I’m sure a whole mess of other things I can’t quite remember. But as you can see, the list was enormous!
Then I went to a foam fabricator and ordered two sheets of 48 x 84 inch foam to build the Stewie and Brian heads. They were 1.5 inches thick. I also bought spray foam glue there.
I ordered a pair of footie pajamas from Amazon to give me a guide for the Brian costume and also a pair of oversized house shoes for his feet.
All in all, after the initial trip to four different places, a couple online orders and probably ten other trips to Hobby Lobby throughout the project we ended up spending about $600 total.
So now that we were all stocked up with supplies and my craft room was littered with Family Guy paraphernalia, it was time to get started on Stewie’s costume. We knew that this would be the most important costume in the group.
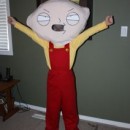
Stewie
First, I found a pattern online for making pants. As I can work on my sewing machine but I’m no seamstress, I did the best I could to take what I thought would be decent measurements of Katy for the Stewie pants. While I started on pinning and sewing those, Katy started tracing and cutting out the general shape and features of the Stewie head, along with painting the buttons for her pants yellow. Once I got the pants sewed, I had her try them back on and then pinned them in the places I needed to take them in. Then I sewed along the lines and cut out the extra fabric. (luckily these were costumes, so I could just turn them inside out and use a Sharpie to mark the lines I planned on sewing, and not have to worry about what they looked like on the inside) Then I measured how wide the straps needed to be by placing the buttons on top of the fabric then cutting it out. I measured over her shoulders to see how long they needed to be and then sewed those onto the pants in the back. I then sewed the buttons on and made sure that the pants fit right. Thank goodness that part was over. Boring! (keep in mind that while we were doing these other things we had multiple things on the stove being dyed; Stewie and Louis’s shirts and Peter’s pants)
Here are a few things we learned that did not work, just in case you decide to tackle a crazy big venture like this. Maybe it will save you some time!
*Peter’s pants never took the dye properly even though we dyed them 3 times because they were 60% polyester and obviously polyester hates being dyed. They were Dickie’s painter pants. So, if for some reason you need to dye some white pants another color, certainly don’t get something made of mostly polyester.
*Foam soaks paint up like a sponge. If you don’t want your foam head to weigh 40 pounds when you get done, DO NOT PAINT IT.
So anyway, Katy got Stewie’s head cut out and the features drawn on with Sharpie and started trying to paint it. Her first attempt was acrylic paint. She made it about 15% across the head and then stopped and told me that it would take all our paint and probably more to finish. So then we tried craft spray paint. This was not even enough of a tone and not the right color. Okay, no big deal. We would try wall paint. We went to Home Depot and had them mix a gallon of paint that was skin colored. The wall paint covered the foam, no problem, but by the time she got the front of Stewie’s head painted it weighed around 10 pounds.
Back to the drawing board!
I then remember that I had an Elmer’s spray glue that you can use for all sorts of things, including fabric. So we made ANOTHER Hobby Lobby run and bought more glue and skin colored fabric. This worked like a charm and weighed nothing. Katy then cut out another Stewie head and redrew the features, cut the holes out for the eyes and the mouth and then did the same thing with the fabric. She then sprayed the foam and smoothed the fabric into place, and voila! We finally had a winner! She then proceeded to cut out the back of the head and the middle piece wide enough to fit her head into the middle, and started to glue all 3 pieces together with our foam glue.
Once this was done, she glued the pipe cleaners for the hair on with hot glue. Then we took about five layers of tulle and glued them together with our Elmer’s spray glue. That was quite a process because you have to spray one side thoroughly and let it dry for about ten minutes and then flip it over and do the same with the other side. We did this about three times on either side before they would stay together and be stiff enough to glue to the Stewie head over his eye holes. We also used this same technique for the Brian eyes. Once all of that was dry, she used black puff paint to outline the eyes, draw on the eyebrows and nose and outline the mouth (which was the hole she used to see through). Finally, we had a presentable Stewie head! Now we needed to start on Brian’s costume, as his would be the other main eye catcher.
Brian
I started out with a pair of XL cotton footie pajamas for the base of the costume and something to sew the furry material to. I laid the pajamas on top of the furry material and traced outside the pajamas to make an outline of what to cut out. I made the mistake of washing them first and they shrunk. I didn’t realize just how much they shrunk until I got the main part of the body completely sewn together, and had my husband try them on. (Keep in mind I had to hand sew the fuzzy material onto the legs because I couldn’t get down the legs with my machine. This took FOREVER and was TERRIBLE! The legs were too short and tight and the body was too tight as well. So I ended up cutting the legs off just below the knee and making them bigger with just the white furry material. I also cut out a strip of material about three to four inches wide to make a flap over where he would be buttoning up the pajamas. I sewed one side to the costume and then sewed Velcro onto the body of the costume so that it would lay over and cover the part that was pulling from being too tight. Then I made a hollow tail and filled it with Polyfill. I had Dave try on the costume so that I could mark where to sew his tail on. This part actually got me excited and made me laugh because it was finally starting to come together. The tail was hilarious and would wag back and forth every time he moved! Then I went ahead and cut the arms off the pajamas so that they wouldn’t be too tight and also so that he wouldn’t have double layers of fabric on his arms, in hopes of making the costume a little cooler. I used the furry fabric to make arms long enough and wide enough so that they would cover the tops of his gloves and so that he could roll them up if he got hot. This part of the costume took about 30 hours from start to finish, and was much harder than I had ever imagined.
The shoes were fairly easy. I had purchased some big house shoes, so all I had to do was lay the furry fabric over them, cut out pieces and then use the Elmer’s spray to glue the fabric to the shoes. Then I used black puff paint to draw the toe lines on.
For Brian’s hands, I used the white clown gloves. I cut out the middles of the ring and pinky fingers and sewed those together so that he would only have four fingers. I mean if we’re going to do this, we were going do it right! Once that was done, I laid the gloves on the furry fabric and made an outline with Sharpie. Then I cut the fabric out and glued it to the top side of the gloves. I had the gloves on while I was doing this and I swear it took me a week to get that glue completely off my wrists where the over spray was. Oops!
The Brian head was another daunting task. The short version is that we started with the snout. Cut a round piece out and glued it together. The end of the nose was covered in a shiny black material and hand stitched the fabric to the foam. Then we glued those two pieces together and cut one piece out that would go over the top of the head. We cut out a half circle piece with eye holes in it for the front of the face, then a piece for the back of the head. I glued all these pieces together. I ended up gluing another piece inside the back piece of the head so that it wouldn’t wobble around on his shoulders. Then I cut out a piece for the front part of his face under his snout. And then another bottom lip shaped piece for his mouth. There was one more piece that we glued along the bottom that he could fit his head into. I cut two slits on the top of the snout and one long one on the bottom for breathing holes. Then I made a big hole inside the mouth for more air and two holes under where the ears would lay. I sewed two empty ears and stuffed them with poly-fill and then hand stitched them to the foam head. I then glued the tulle pieces over the eye holes and cut circles out for him to see through. Then we glued the furry fabric all over the head. I used black puff paint to outline the mouth and the eyes. When this was dry I filled in the eyelids and whites of the eyes with white puff paint. Once all of this was done, I cut out a red collar and hand stitched this to the bottom of the foam head. I spray painted the plastic jewellery charm we bought with gold spray paint, and when that dried I wrote ‘Brian’ on it with black Sharpie.
Brian carries a martini around with him almost all the time, so I bought a martini glass and some of the stuff they use to make fake water in flower arrangements. I cut out a little ball of foam to make a fake olive and painted it green and put a plastic toothpick through it. I put it in the bottom of the glass and after mixing the two parts to make the fake water, poured it into the glass. The foam kept wanting to float out of the mixture, so I used a chip clip to secure it until the mixture dried. Funny thing is when we walked into the bar, the bouncer wanted to make sure that it was a fake cocktail. He wanted to know what I used to make it and also wanted to touch it. I will say it was an awesome prop! And Dave didn’t have to try to carry around a real martini without spilling it!
Finally, I finished this time consuming costume and it turned out amazing! I haven’t made my mind up if it was worth all the work or not, but I will say that it was a hit and no one could believe that I made the entire thing. I can’t even tell you how many people asked where we bought the costume, which I guess was a bit of an ego boost. Now for the easy parts of this group costume:
Wigs, Shoes, Under Shirts, Pants and Chris’s Hat
I made Katy sit outside and wear three separate wigs while I cut them to somewhat resemble the haircuts of the characters. I’m a hairdresser and let me tell you, cutting synthetic hair is not the same as cutting human hair. It was quite a funny process because the feel of the fake hair totally grossed Katy out, so the whole time I was trying to cut them she was randomly gagging and scratching her face – just trying her best to keep it together until I finished. Of course this was cracking me up, so I had to stop a few times to laugh while she leaned over and gagged! I had her boyfriend Billy wear his ‘Peter’ wig while I cut that, and I will say that he handled it much better than she did.
The shoes were fun because all we had to do was paint them with acrylic paint, and we both love painting. Louis’s shoes were more of a slip on, so we cut out the top part of the shoe to make it look like hers.
Once we got the white of Chris’s shoes painted and dried, we painted on the red stripes. Once that dried, Katy outlined the red with black Sharpie to make them look just like Chris’s sneakers! Meg’s were super easy because they were just plain gray.
For Peter’s shoes, I made a brown slip cover for Billy’s tennis shoes out of felt and elastic that I was able to stuff with poly-fill to make them look big and ‘cartoony’.
We found a child’s cartoon hat for Chris that had the right shape and the back was black, so we just mixed the paint to the right color and painted the front a light orange to look like his hat.
For Chris and Peter’s fat, I sewed 2 wife beaters together for them to wear under their regular costume shirts. Then we stuffed them to the brim with poly-fill.
Since Peter’s pants didn’t dye properly we ended up using green sweat pants. I pulled the drawstring out of them and cut it into 6 belt loops, then sewed them on around his waist. Now for Meg…
Meg
I cut out the collar of the pink t-shirt and the bottom part of the sleeves, so that the white would show through like Meg’s. Then I sewed the collar, sleeves and the bottom of the two t-shirts together. That way I wouldn’t be fidgeting with the shirts all night making sure they looked right.
I couldn’t find any glasses that were big enough, so I made them out of a thin wire. I wound about three circles of the wire together and then used another length of wire to wind around (about a million times; my fingers were bruised for about two days) those three to make them stronger. Once the shape was complete, I painted them black with craft spray paint and hot glued black ribbon to the ear pieces so they wouldn’t be uncomfortable.
The only beanie I could find that would work was a Hello Kitty one that was pink on the inside. So I cut the seams apart and cut the Hello Kitty part off and then just re-sewed the seams back together. Easy and quick. That’s all the pieces of this elaborate but simple looking costume. You guys said “the more the merrier“, but I don’t know if you were banking on this giant essay! Hopefully you enjoy the read and can understand just how much work Katy and I put into them.
On to Halloween night!
The Winning Costume
So we finally made it to Halloween night and even managed to keep our sanity! We went to an Ale House named Tapwerks in Bricktown, Oklahoma City in hopes of impressing the patrons, having a blast together and winning the costume contest. From the moment we walked into the bar, everyone we passed was saying “oh my gosh, it’s Family Guy! They’re definitely going to win the contest…” As you can imagine, this put us in quite a good mood and made for a very fun night. We got there early so that we could mingle, show off our costumes, and get tables. People kept coming up to our tables all night wanting to know about our costumes and telling us how awesome they were! We also had two more friends join us as ‘Herbert the Pervert’ and ‘Consuela’ the housekeeper, as they already had the costumes from a previous Halloween. This was just the cherry on top of the night, because my friend dressed as Herbert had the voice down perfect and was walking around ‘whistle-talking’ to everyone and creeping on them! Needless to say, there were lots of laughs that night. Once the contest rolled around I was so nervous. There were lots of really good costumes there and we weren’t sure if we were going to win or not. They had each costume come up individually to let people see them and so the ‘judge’s panel’ could take notes. This took a good 30 minutes. But when the time came to announce the winners, the DJ actually said “and I think we ALL know who won 1st Place… it’s the Family Guy!!” We were so excited, and we won $500! Which pretty much paid for our costumes. For me, that’s a definite win!
Will I ever attempt another costume of this magnitude? Probably not. But we did have a good time making them and they turned out amazing, so all in all, a very memorable and fun Halloween.

Related costumes:
 Coolest Stewie Griffin Halloween Costume for a Boy
 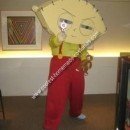 Coolest Homemade Stewie Griffin Costume
 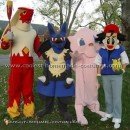 65+ Coolest Homemade Pokemon Costume Ideas
 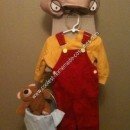 Coolest Homemade Stewie Griffin Halloween Costume Idea
 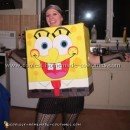 65+ Coolest Homemade SpongeBob Costume Ideas
 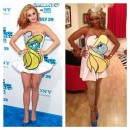 Sexy Homemade Katy Perry Smurfette Dress/Costume
  Creative Tim Burton’s 9 the Movie Costume
 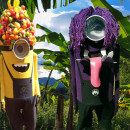 Make Your Own Awesome Minion Costumes
Your comment has been sent successfully.